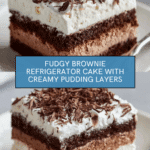
Brownie Refrigerator Cake Recipe
If you are looking for a dessert that combines luscious layers of rich brownies, creamy filling, and silky pudding all chilled to perfection, then the Brownie Refrigerator Cake is your new best friend in the kitchen. This dessert is the perfect balance between decadent and refreshing, making it an absolute crowd-pleaser for any occasion. It’s easy to make, transforms simple ingredients into a showstopper, and tastes like it took hours to prepare—only it doesn’t. Trust me, once you try this Brownie Refrigerator Cake, it will quickly become your go-to recipe for impressing friends and family alike.
Ingredients You’ll Need
Gathering the right ingredients is the first step toward creating this irresistible treat. Each element plays a crucial role: the fudgy brownie base forms a sturdy foundation, the cream cheese mixture adds tangy sweetness and creaminess, and the pudding layers bring a smooth, dreamy texture. Together, they make a dessert that’s both indulgent and light at the same time.
- Brownie mix (9×13 pan size): Choose your favorite brand for an easy and reliable chocolate base.
- Extra-large egg: Adding one more egg than the package calls for creates a richer, fudgier brownie crust.
- Cream cheese (8 oz), softened: This brings a velvety tang and helps the cream layer hold together beautifully.
- Powdered sugar (1 cup): Adds just the right amount of sweetness to balance the cream cheese.
- Whipped topping (2 containers, 8 oz each): Gives the dessert airy lightness and creaminess in two layers.
- Chocolate instant pudding (3 oz): Infuses a deep chocolate flavor for the pudding layer.
- Vanilla instant pudding (3 oz): Adds smooth sweetness and complements the chocolate perfectly.
- Milk (3 1/2 cups): Essential for making the pudding layers just right in consistency.
- Hershey bar or chocolate syrup: Used for garnish, it lends a final touch of chocolatey elegance.
How to Make Brownie Refrigerator Cake
Step 1: Prepare the Brownie Base
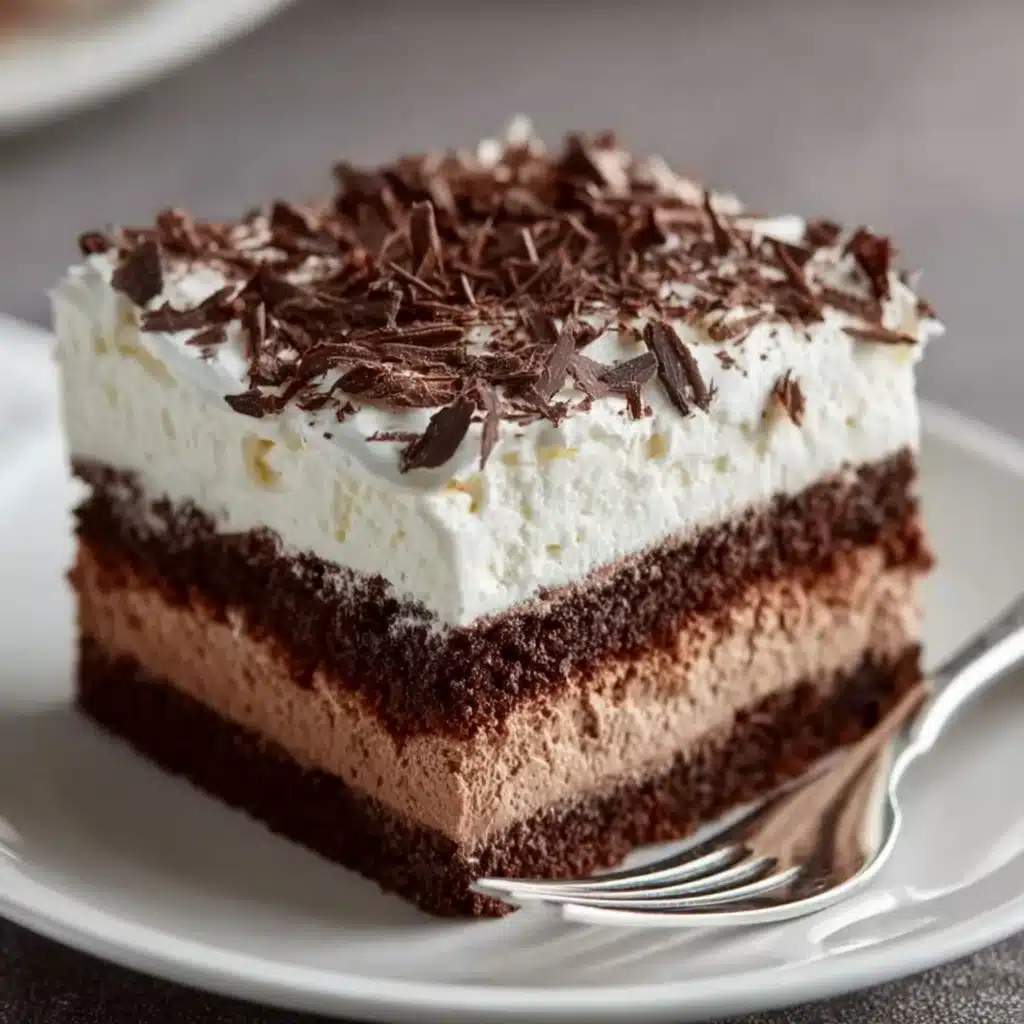
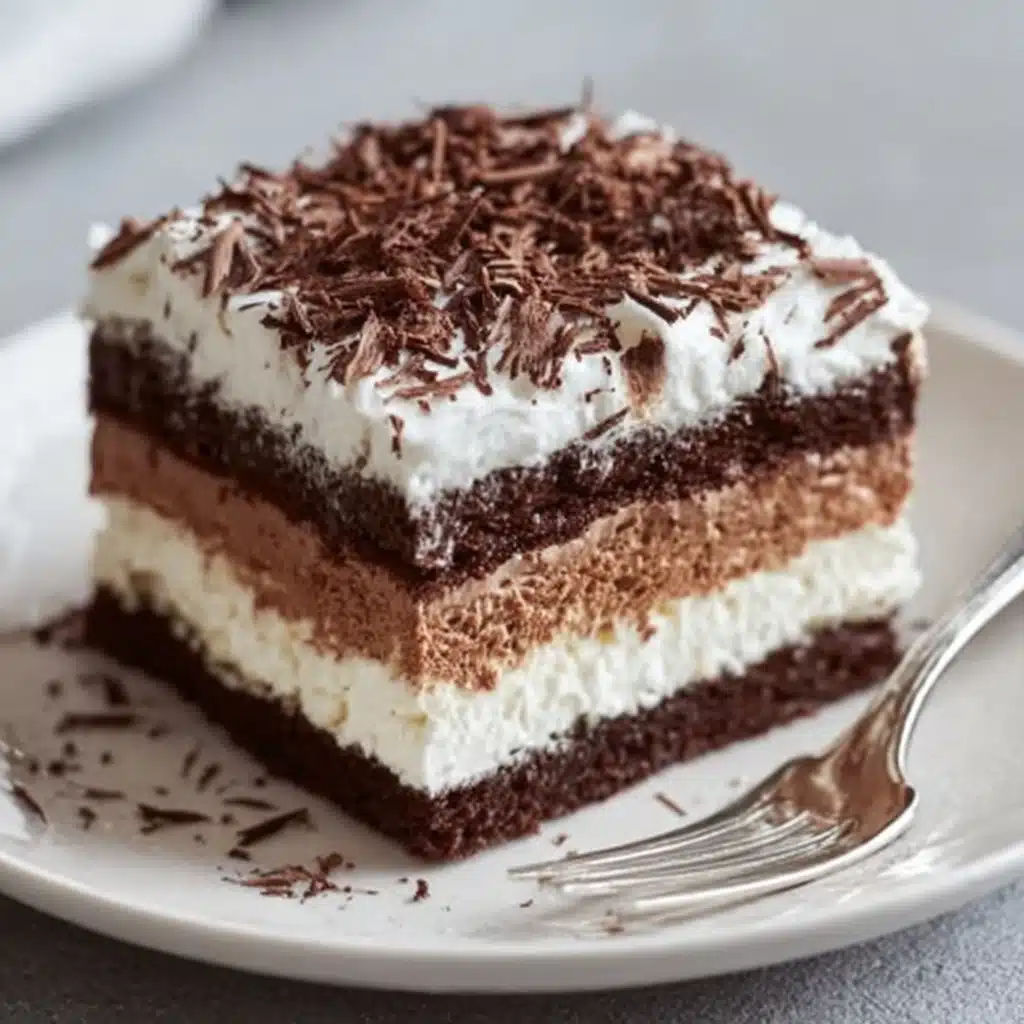
Start by following the brownie mix instructions but be sure to add that extra-large egg for an ultra-fudgy texture that sets this dessert apart. Bake the brownies in a 9×13 pan and then let them cool completely; this is important so your layers don’t melt or slide around when you assemble the cake.
Step 2: Create the Cream Cheese Layer
Beat together the softened cream cheese with powdered sugar until smooth and creamy. Fold in one container of whipped topping gently, preserving the airy texture. This layer adds the perfect balance of sweet and tang that cuts through the richness of the chocolate brownie base beautifully. Spread it evenly over the cooled brownies for a luscious second layer.
Step 3: Whip up the Pudding Layers
Combine the chocolate and vanilla instant pudding mixes with milk, whisking them until thick and velvety. This dual-flavored pudding layer is the magic touch, marrying chocolatey depth with sweet vanilla smoothness. Carefully spread the pudding mixture on top of the cream cheese layer, making sure it’s evenly distributed for the best mouthfeel in every bite.
Step 4: Add the Final Whipped Topping Layer
Spread the remaining whipped topping smoothly over the pudding to create a cloud-like finish for your Brownie Refrigerator Cake. This topping seals the layers underneath and gives that dreamy, fluffy texture that makes the dessert irresistible.
Step 5: Garnish and Chill
Top your masterpiece with freshly shaved chocolate from a Hershey bar or drizzle chocolate syrup to add visual appeal and extra decadence. Then refrigerate the entire cake for at least two hours to let all the flavors meld together and set perfectly for slicing. This chilling step is what truly transforms this dessert into a luxurious, make-ahead treat.
How to Serve Brownie Refrigerator Cake
Garnishes
Beyond the classic chocolate shavings or syrup, consider fresh raspberries or a dusting of cocoa powder for a pop of color and extra tang. Mint leaves can add a refreshing aroma and sophisticated look. Garnishes are your chance to personalize and elevate the presentation, so have fun with it!
Side Dishes
This cake pairs wonderfully with a scoop of vanilla bean ice cream or a dollop of homemade whipped cream to make every bite feel even more indulgent. For a fruity twist, serve alongside fresh berries or a compote to cut through the richness and brighten the flavors.
Creative Ways to Present
Try serving the cake in individual glass parfait cups to show off the layers or cut into small squares and place on decorative dessert plates with a drizzle of caramel or berry sauce. Offering mini brownie refrigerator cake bites at a party will wow your guests and make sharing the love even easier.
Make Ahead and Storage
Storing Leftovers
Keep your Brownie Refrigerator Cake covered tightly with plastic wrap or in an airtight container in the refrigerator to maintain freshness. It will stay delicious and moist for up to 4 days, making it a perfect dessert to prepare in advance.
Freezing
If you want to freeze leftovers, wrap portions individually in plastic wrap and place them in a freezer-safe container. This dessert freezes well for up to one month. When ready to enjoy, thaw overnight in the refrigerator so textures remain intact.
Reheating
Because this cake is best served chilled, reheating is not recommended. Instead, allow frozen slices to thaw naturally and savor the cool, creamy goodness straight from the fridge for the full experience of a perfect Brownie Refrigerator Cake.
FAQs
Can I use homemade brownies instead of a mix?
Absolutely! Homemade brownies work wonderfully as the base. Just make sure they’re baked in a 9×13 pan and cooled completely before layering.
Is it necessary to add the extra egg to the brownie mix?
Adding the extra egg enriches the brownies and makes them fudgier, but if you prefer a more traditional texture, you can stick to the package instructions instead.
Can I substitute the whipped topping with homemade whipped cream?
Yes, homemade whipped cream is a fantastic substitute and will give your cake a fresh, light texture. Just be sure to use it immediately so it holds up well in the layers.
How long should I chill the cake before serving?
Chill the Brownie Refrigerator Cake for at least two hours, but overnight is even better to allow flavors to meld and layers to set perfectly.
Can I use different flavors of pudding?
Of course! Feel free to experiment with other pudding flavors like caramel or butterscotch for a unique twist on this classic recipe.
Final Thoughts
This Brownie Refrigerator Cake is truly a dessert that feels like a warm hug on a plate—rich, comforting, and utterly satisfying. Its layers of fudgy, creamy, and silky textures create a harmony that’s hard to resist. Whether you’re making it for a holiday, a family gathering, or just because you deserve a sweet treat, I promise it will bring smiles all around. Give it a try and get ready to add a new favorite to your dessert rotation!
PrintBrownie Refrigerator Cake Recipe

A decadent Brownie Refrigerator Cake featuring a rich fudgy brownie base topped with a creamy layer of sweetened cream cheese, luscious chocolate and vanilla pudding, and fluffy whipped topping, all garnished with chocolate shavings for an irresistible no-bake dessert.
- Prep Time: 20 minutes
- Cook Time: 25 minutes
- Total Time: 2 hours 45 minutes
- Yield: 12 servings 1x
- Category: Dessert
- Method: Baking and Assembling
- Cuisine: American
- Diet: Vegetarian
Ingredients
Brownie Base
- 1 brownie mix (9×13 pan size)
- 1 extra-large egg (additional to package directions)
Cream Cheese Layer
- 1 package cream cheese (8 oz), softened
- 1 cup powdered sugar
- 1 container whipped topping (8 oz)
Pudding Layer
- 1 package chocolate instant pudding (3 oz)
- 1 package vanilla instant pudding (3 oz)
- 3 1/2 cups milk
Topping
- 1 container whipped topping (8 oz)
- 1 Hershey bar (for shavings) or chocolate syrup
Instructions
- Prepare the Brownies: Follow the package directions for the brownie mix, but add an extra-large egg beyond what’s called for in the instructions to achieve a fudgier texture. Pour the batter into a 9×13 inch pan and bake as directed. Allow the brownies to cool completely before layering.
- Make the Cream Cheese Layer: In a mixing bowl, blend the softened cream cheese with powdered sugar until smooth. Fold in one container (8 oz) of whipped topping gently until fully incorporated. Spread this mixture evenly over the cooled brownies.
- Prepare the Pudding Layer: In a separate bowl, whisk together the chocolate and vanilla instant pudding mixes with 3 1/2 cups of cold milk. Continue whisking until the mixture thickens. Spread this pudding layer evenly over the cream cheese layer.
- Add the Whipped Topping: Take the remaining container of whipped topping and spread it evenly over the pudding layer, smoothing the surface with a spatula.
- Garnish and Chill: Garnish the top with chocolate shavings made from a Hershey bar or drizzle with chocolate syrup for added decor and flavor. Refrigerate the cake for at least 2 hours to allow the layers to set and flavors to meld before serving.
Notes
- Adding an extra egg to the brownie mix enhances fudginess, making the base richer.
- Ensure the brownies are completely cooled before adding the cream cheese layer to prevent melting and mixing of layers.
- Use chilled milk for pudding preparation to help it set faster.
- Refrigerate for at least 2 hours; however, chilling overnight will yield even better texture and flavor integration.
- Substitute dairy whipped topping with non-dairy alternatives for a lactose-free version.
- Chocolate syrup can be used if you prefer a smoother topping rather than shavings.
Nutrition
- Serving Size: 1 slice (1/12 of cake)
- Calories: 360
- Sugar: 30g
- Sodium: 220mg
- Fat: 18g
- Saturated Fat: 10g
- Unsaturated Fat: 6g
- Trans Fat: 0.5g
- Carbohydrates: 45g
- Fiber: 2g
- Protein: 5g
- Cholesterol: 45mg
Keywords: brownie refrigerator cake, no-bake dessert, cream cheese pudding cake, layered brownie dessert, chocolate vanilla pudding dessert